Budget Power Rack Audit: 5 Hidden Failure Points to Avoid


The Iron Verdict
This article has been audited against our “Buy-Once, Cry-Once” standard.
-
Durability:
Inspected for long-term (10+ year) use. -
Value:
Checked for critical failure points (like cheap plastic & hardware). -
Brand:
Verified to be from a reputable, high-quality brand.
You are standing in your garage, scrolling on your phone looking for a Budget Power Rack.
You are looking at a $300 unit from a brand you’ve never heard of on an online marketplace. You see thousands of positive reviews, but your gut tells you it’s “too good to be true”.
You are right to be skeptical. That feeling of hesitation is what separates a smart investor from someone who is about to waste $300 on a 200-pound piece of landfill-bound metal.
The home gym market is flooded with cheap, “Amazon-style” racks. Their product pages are full of conflicting reviews and misleading, inflated weight capacities.
Meanwhile, “Tier 2” fitness blogs offer shallow “pros and cons” lists but fail to answer your core question: Why is this Budget Power Rack so cheap? They can’t tell you what to physically look for to prove it’s a bad investment.
This is where we come in. We are The Iron Verdict. We are not simple reviewers; we are expert investment advisors for your home gym.
Our core philosophy is “Buy-Once, Cry-Once”. Our competitors review; we audit. Our purpose is to protect your investment and your safety.
This guide will not just give you a list of picks. It will teach you how to be a physical inspector.
We will arm you with a 5-point inspection checklist to identify the exact failure points that separate a 10-year Power Rack from a 2-year landfill product.
The “Buy-Once” Standard: What a 10-Year Power Rack Looks Like
Before we inspect the bad, we must establish the good. A “Buy-Once, Cry-Once” Power Rack is the gold standard against which all budget equipment must be judged.
This standard is not arbitrary. It is defined by the specifications of industry-leading brands and commercial-grade equipment.
The “Buy-Once” standard is:
- Steel Tubing: 3″x3″ uprights
- Steel Gauge: 11-gauge steel
- Hardware: 5/8″ (M16) or 1″ (M20) hardware
- Capacity: A true, conservatively rated 1,000lb+ rackable capacity
- Ecosystem: A massive, interchangeable ecosystem of compatible attachments
A beginner sees a rack as a single, static object—a “product.” This is incorrect. A high-quality rack is not a product; it is a platform.
When you look at premium brands, you do not just see racks. You see “families” or “series”—the Rogue Monster and Monster Lite series, or the Rep PR-4000 and PR-5000 series.
These “families” are defined by their core specs. The entire aftermarket attachment industry is built around these standards.
Buying a rack that meets the “Buy-Once” standard means that five years from now, when you have advanced as a lifter, you can upgrade. Whether you want to add jammer arms, a lat pulldown, a belt squat, or a monolift, those attachments will exist and they will fit.
This is the true, long-term financial meaning of “Buy-Once, Cry-Once”. A cheap, non-standard Budget Power Rack is a dead-end product. You have just locked yourself out of that entire future.
The 5 “Failure Points” of a Budget Power Rack (And How to Inspect Them)
Here is the core of our inspection. These are the exact five corners manufacturers are forced to cut to get the price of a Power Rack down to $300.
We will now teach you how to spot every single one.
Failure Point #1: Thin Steel on a Budget Power Rack
This is the most common and most critical failure point. It is the single biggest “tell” of a 2-Year Landfill rack.
The Primary Red Flag: If a product page does not explicitly state the steel gauge, run. Do not walk, run.
They are hiding it because it is the “lower limit” of what can be sold safely.
How to Read “Steel Gauge”:
This is a counter-intuitive measurement. The lower the number, the thicker and stronger the steel.
- 11-Gauge (approx. 3.0mm): This is the “Buy-Once” gold standard. It is the accepted industry minimum for high-end, commercial-grade racks from companies like Rogue, Rep, and Titan’s high-end series.
- 12-Gauge (approx. 2.6mm): This is “acceptable”. A rack like the Fringe Sport model, a decent budget option, uses this.
- 14-Gauge (approx. 1.9mm): This is the “Landfill Tier.” This steel is significantly thinner, weaker, and cheaper. This is the steel used in the cheapest “Amazon-style” racks, such as the Fitness Reality 810XLT.
Why It Matters (The “Wobble” Problem):
The real-world difference is not the (often-inflated) 800lb weight capacity. A 14-gauge rack can statistically hold a heavy weight.
The real issue is stability and wobble.
A 14-gauge Budget Power Rack will “flop all over the place”. It will shake when you do dips and wobble when you re-rack a heavy squat. It will generally kill your confidence.
This wobble is the #1 complaint from users who buy cheap racks and the #1 reason they end up replacing them.
But the stability is only the first problem. The real, hidden failure is what we call the “Dead-End Ecosystem” trap.
The primary fear of a “Buy-Once” investor is wasting money on a rack that must be replaced. A 14-gauge rack (like the Fitness Reality 810XLT.) does not use 3″x3″ steel. It uses thin, non-standard tubing like 1.25″x1.25″ or 2″x2″.
The entire modern attachment ecosystem is built for 3″x3″ tubing.
Therefore, buying a 14-gauge, 2″x2″ Budget Power Rack is not a small compromise. It is a catastrophic, long-term financial error.
You are buying a dead-end product. You are permanently locked out of the “Buy-Once” attachment ecosystem. When you want to upgrade, you can’t.
You will have to sell your “landfill” rack for pennies on the dollar and buy the 3×3 rack you should have bought in the first place. This is the true, hidden failure point of thin steel.
Your Inspection Checklist:
- Check the Gauge: Is it 11-gauge? If not, is it at least 12-gauge? If it’s 14-gauge or not listed, it’s a “Landfill” rack.
- Check the Uprights: Are they 3″x3″? If they are 2″x2″, 2.36″x2.36″ (a metric size), or worse, 1.25″x1.25″, you are buying a dead-end product.
Steel Gauge Inspection Chart
| Gauge | Thickness (Approx.) | The “Iron Verdict” (What it means) |
|---|---|---|
| 11-Gauge | ~3.0mm | Buy-Once Standard. The 10-year+ rack. Rock-solid stability. Unlocks the complete 3×3 attachment ecosystem. |
| 12-Gauge | ~2.6mm | Acceptable Budget. Will have minor wobble. A valid budget compromise, if it has 3×3 uprights. |
| 14-Gauge | ~1.9mm | 2-Year Landfill. Prone to “sketchy” wobble. Always paired with non-standard, dead-end uprights. AVOID. |
Failure Point #2: Weak Welds on Cheap Power Racks
A weld is a “permanent bolt.” It is the process that fuses the steel components together.
On cheap equipment, welding is a primary corner that gets cut. High-quality welding is time-consuming and requires skilled labor—two things a $300 Budget Power Rack cannot afford.
You do not need a welding certification to inspect a rack; you just need to know what to look for.
What a “Good” Weld Looks Like:
A high-quality weld is defined by its uniformity. It should be consistent from start to finish, often looking like a “stack of dimes“.
The edges of the weld “wet” smoothly into the base steel and are not “pasted on”. It is clean, with no visible gaps, holes, or cracks.
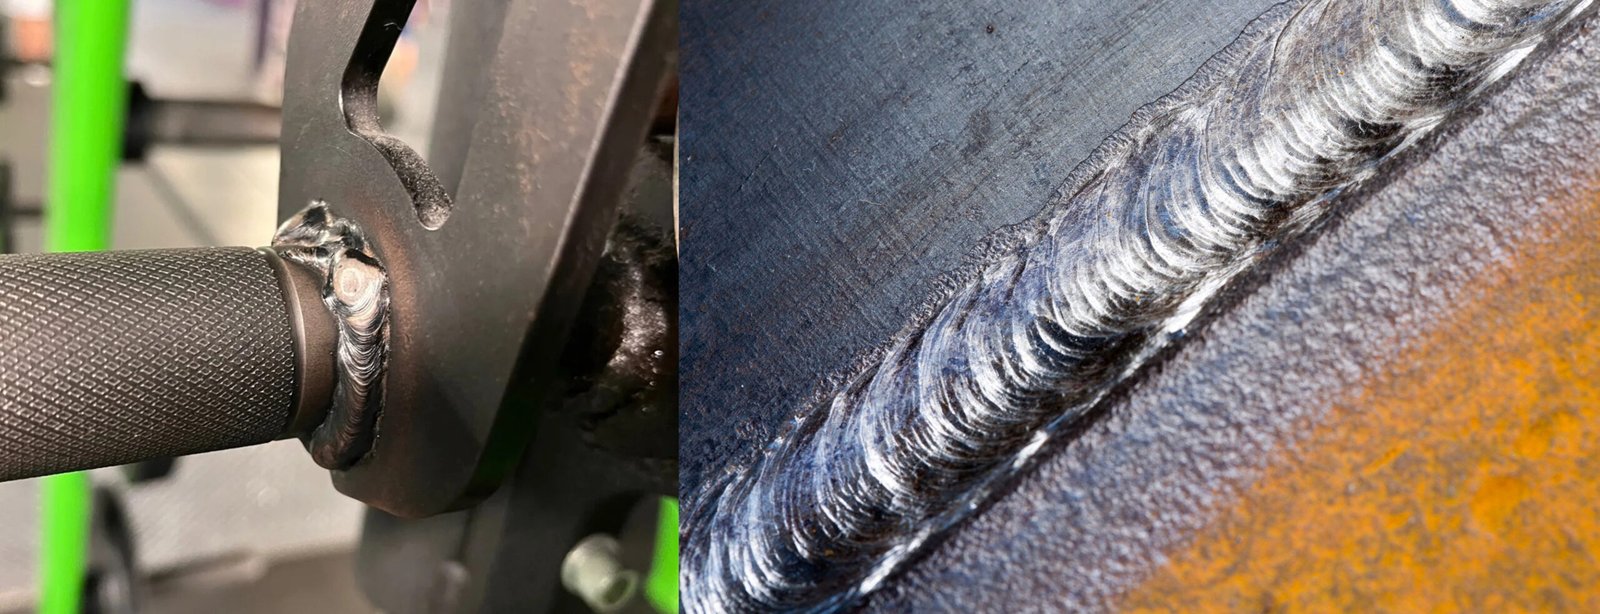
What a “Bad” (Grumpy) Weld Looks Like:
Certified welders are often “shocked” by the “grumpy” welds they find on gym equipment. Look for these four main defects:
- Porosity: You will see small pinholes or bubbles on the surface of the weld. This is not a cosmetic flaw. This is gas that was trapped inside the molten metal as it cooled, creating a weak, “sponge-like” structure that is highly prone to cracking.
- Spatter: These are the messy metal droplets splattered around the weld. This is a clear sign of a rushed, low-quality, or improperly-tuned automated process.
- Craters: Look at the very end of a weld. A “bad” weld will have a concave divot or hollow spot. This is a critical weak point and a common place for cracks to form.
- Undercutting: This is a groove or channel at the edge of the weld, where the base metal was melted away but not filled in by the welder. This creates a “notch,” which is a severe stress concentration point that can lead to failure.
A beginner might look at a “grumpy” weld and think, “It’s just ugly, who cares?” This is a mistake. A single bad weld is unlikely to fail on day one.
“The bad weld is not just a single, isolated flaw. It is a visible symptom of a much larger, invisible disease: a complete and total lack of quality control in the manufacturing process.”
These defects—porosity, spatter, undercutting—are all known symptoms of a rushed process. They indicate improper machine settings, contaminated materials, or unskilled labor.
If the factory is cutting this visible corner, they are 100% cutting corners on the things you can’t see. This includes steel sourcing, hardware grades, and engineering tolerances.
A bad weld is the physical proof that validates your “too good to be true” fear. It is the ultimate “tell” of a bad Budget Power Rack.
Failure Point #3: Undersized Hardware on a Budget Power Rack
The bolts are the literal linchpins of your rack. This failure point has two parts: Size (which is a red herring) and Quality (which is the real danger).
Part 1: Hardware Size (The “Ecosystem” Choice)
Premium racks use one of two standards: 5/8″ (approx. M16) or 1″ (approx. M20) hardware. A 5/8″ pin has an estimated shear strength of ~12,000 lbs.
It is more than strong enough for any human. The only reason to choose one size over the other is attachment compatibility. You are simply choosing which “ecosystem” to buy into (e.g., 5/8″ for Rogue Monster Lite / Rep PR-4000, 1″ for Rogue Monster / Rep PR-5000). Both are “Buy-Once” standards.
Part 2: Hardware Quality (The “Mystery Metal” Red Flag)
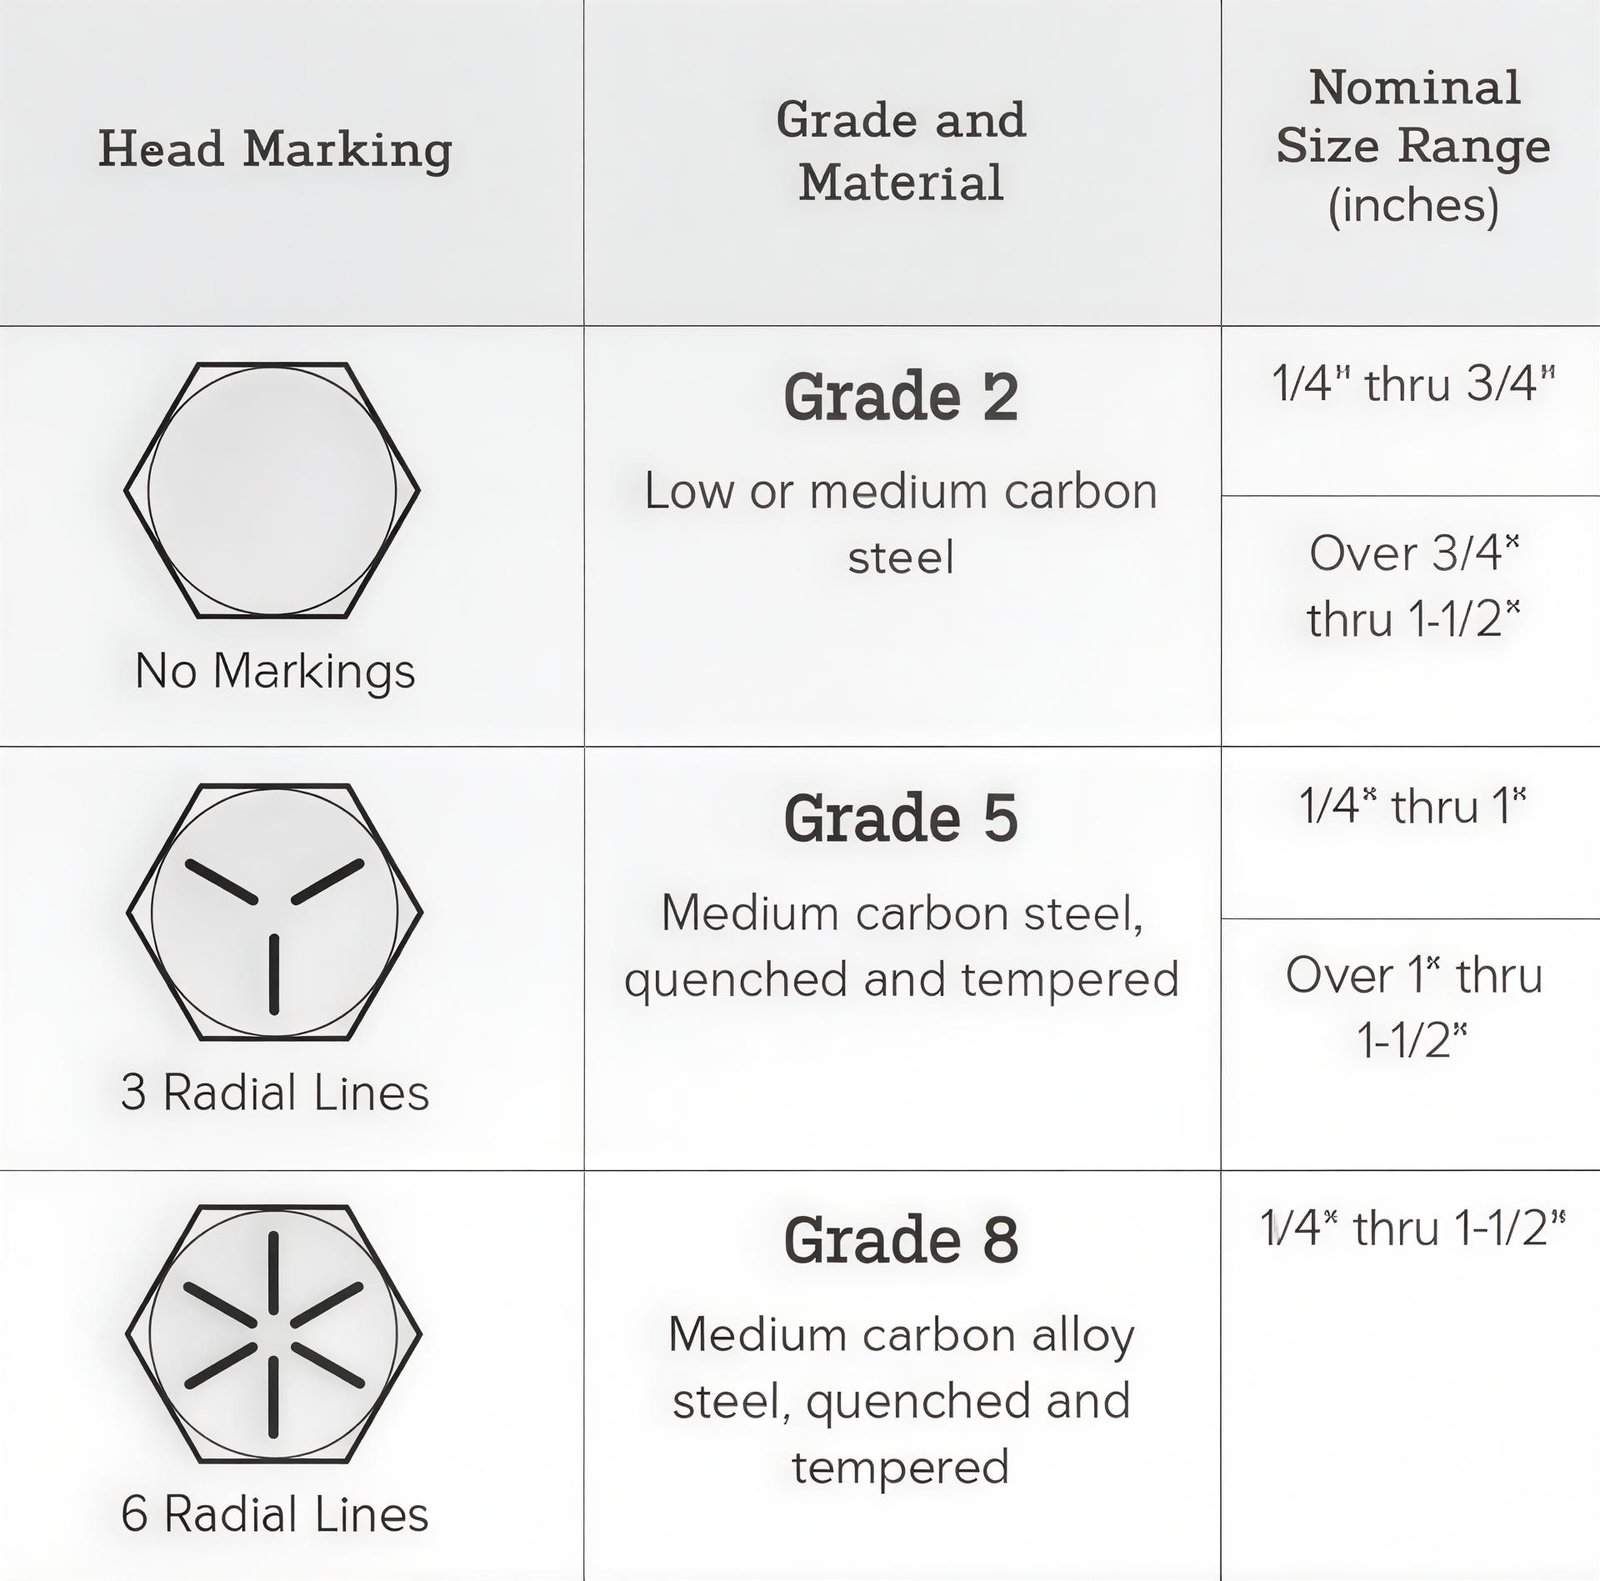
This is the real failure point. To save money, cheap Power Racks ship with the softest, cheapest “mystery metal” bolts they can find. You can identify a bolt’s strength (its “Grade”) by the markings on its head.
- The “Landfill” Bolt: Grade 2 (or Metric 4.8)
- How to Spot: The head will have NO markings.
- What it is: Soft, low-carbon steel. This is the cheapest bolt available.
- The “Good” Bolt: Grade 5 (or Metric 8.8)
- How to Spot: The head will have 3 radial lines.
- What it is: Medium-carbon steel, heat-treated. Tensile strength of ~120,000 psi.
- The “Buy-Once” Bolt: Grade 8 (or Metric 10.9)
- How to Spot: The head will have 6 radial lines.
- What it is: High-strength alloy steel, heat-treated. Tensile strength of ~150,000 psi, which is more than double the strength of a Grade 2 bolt.
A beginner sees a thick bolt and assumes “a bolt is a bolt.” The manufacturer is counting on this.
The “mystery metal” bolt is a hidden failure point. A rack standing still has low force on its bolts. But a failed lift—dumping a 300lb squat or dropping a bench press—puts immense, sudden shear force on that hardware.
The unmarked, Grade 2 bolt is designed to look strong. However, it will fail under the exact catastrophic scenario it is supposed to protect you from.
The Iron Verdict:
When you unbox your rack, inspect the bolt heads. If they are blank (Grade 2), go to the hardware store immediately and replace every single one with a Grade 8 (or Metric 10.9) equivalent. This is the cheapest, most important safety upgrade you can make.
Bolt Inspection Guide (SAE Standard)
| Head Marking (Visual) | Grade | “The Iron Verdict” (Strength & Action) |
|---|---|---|
| No Markings | Grade 2 | Landfill Tier. Low-strength. A critical failure point. REPLACE IMMEDIATELY. |
| 3 Radial Lines | Grade 5 | Good Standard. Medium-strength. Acceptable for most uses. |
| 6 Radial Lines | Grade 8 | Buy-Once Standard. High-strength. This is the non-negotiable standard for structural integrity. |
Failure Point #4: Plastic Parts on a Budget Power Rack
Not all plastic is bad. But plastic on a critical load path is a primary point of failure. On a Budget Power Rack, this component is the J-cup.
Failure 1: The Liner (Destroying Your Barbell)
The “Buy-Once” standard for J-cup liners is UHMW (Ultra High Molecular Weight) plastic. This material is exceptionally durable, self-lubricating, and impact-resistant.
The #1 red flag of a “Landfill” J-cup is no plastic protection on the front lip.
This is the part of the cup you hit 99% of the time when re-racking a squat. If this lip is bare steel, it will act like a file and destroy the knurling on your expensive Barbell.
A cheap rack that ruins a $400 Barbell is the very definition of “penny-wise, pound-foolish”.
Failure 2: The J-Cup Itself (Catastrophic Failure)
The J-cup is the single component you must trust with 100% of the weight, 100% of the time. It is the last place you should accept a “budget” compromise.
There are multiple, verified user reports of J-cups from budget-friendly brands snapping and failing under load.
- Evidence: A Rep Fitness J-cup failed during a bench press, dropping the bar on the user (who was thankfully uninjured).
- Evidence: Other reports show J-cups from budget brands snapping at the weld or the pin.
- Evidence: This is not always a high-weight issue. One failure occurred with only 145lbs, indicating a clear manufacturing flaw or stress fracture over time.
The visual red flag is a standard, bare-metal “hook-style” J-cup or one with a thin, ill-fitting plastic liner that is not UHMW.
The “Buy-Once” solution is a “Sandwich” J-Cup, which uses thick UHMW “sandwiched” between two steel Plates for 360-degree protection and a more robust design.
If your budget rack includes a lat pulldown, the #1 plastic failure point is the pulley wheel. Cheap attachments use brittle “nylon” wheels that can crack or snap, dropping the weight stack. A “Buy-Once” attachment will always use aluminum or high-quality “bearing pulley” wheels.
Failure Point #5: Poor Powder Coating on Your Power Rack
The “powder coat” is the paint. On a “Buy-Once” rack, this is a thick, durable, electrostatically-applied finish that resists chipping and rust. On a Budget Power Rack, it’s often a cheap, thin layer of paint sprayed on as quickly as possible.
The Failure:
The powder coat on cheap racks will flake, chip, and peel. It often arrives damaged from the factory due to poor packaging and handling.
User complaints consistently show this happens first on friction points, like where J-cups and safeties rub the uprights.
Furthermore, the coating inside the uprights is often incomplete. This is not a cosmetic issue. It is a structural integrity issue.
This exposes the “Garage Gym Fallacy.” A beginner thinks, “My rack is indoors, why do I care about rust?” Your garage or basement is not a climate-controlled environment. It is subject to high humidity, condensation from temperature swings, and sweat.
The powder coat is the only thing protecting the raw steel from that moisture. The moment that cheap coat chips, the steel underneath is exposed.
Surface rust is immediate. That rust will then creep under the remaining cheap powder coat, causing it to bubble and flake even more.
Within 2-3 years, your “new” $300 rack is a rusty, ugly, and structurally compromised “2-Year Landfill” product. This is the direct, physical result of a company cutting corners on the finish.
Your Inspection Checklist:
- Look at user reviews with photos. Do you see complaints about shipping damage, chipping, or flaking?
- When you unbox, look for paint flakes inside the box.
- Inspect the inside of the uprights and the laser-cut holes. Is the coating complete, or can you see bare metal?
The “Iron Verdict”: Is a Budget Power Rack Ever Worth It?
After inspecting all five failure points, we can now render our final verdict.
A reputable Budget Power Rack (e.g., a Titan T-series. or Rep PR-1100) can be “worth it” for a novice-to-intermediate lifter.
- IF you are on a strict budget and would rather (correctly) spend your money on a high-quality Barbell and Plates.
- IF you understand its limitations: you will have some wobble, you must inspect and likely replace the hardware, and you may be in a limited attachment ecosystem.
However, the cheapest “Amazon-style” racks (like the Fitness Reality 810XLT.) are never worth it. The evidence is overwhelming:
- The steel is 14-gauge.
- The uprights are thin and non-standard (e.g., 1.25″x1.25″), locking you into a dead-end platform.
- The stability is “sketchy” and confidence-killing.
- The J-cups are bare metal, guaranteeing damage to your Barbell.
You will be forced to buy another rack in 2-3 years as you advance. This is the very definition of violating the “Buy-Once, Cry-Once” philosophy.
Our Official Recommendation:
A Budget Power Rack is only worth considering if it meets these three non-negotiable minimum standards:
- 3″x3″ or 2″x3″ Uprights (For some attachment compatibility).
- 12-Gauge Steel (14-gauge is a non-starter).
- Standard 5/8″ Hardware (To buy into an ecosystem).
If the rack you are eying fails these three tests, do not buy it. Save your money for another six months. Your safety and your long-term investment are worth the wait.
Our Top-Rated “Buy-for-Life” Racks:
- Top-Rated (1″ Ecosystem): REP PR-5000
- Top-Rated (5/8″ Ecosystem): Bells of Steel Hydra
- Best Overall BIFL Value for Canadians: Bells of Steel Hydra
- “Money-is-No-Object” Pick: Rogue Monster RM-6
You have now learned how to inspect a power rack like a pro. If you would rather skip the inspection and see the racks that have already passed our audit and earned the “Buy-for-Life” stamp of approval. Check out this article to learn why buying a non-standard rack costs you double.
References & Sources
- I BOUGHT the CHEAPEST Power Rack on Amazon… – YouTube, accessed November 16, 2025, https://www.youtube.com/watch?v=ZvFeJZCaALU
- PR-4000 Rack Builder | REP Fitness | Home Gym Equipment, accessed November 16, 2025, https://repfitness.com/products/pr-4000-rack-builder
- Power Rack Attachments & Compatibility – 2024 Master List | Two Rep Cave, accessed November 16, 2025, https://www.tworepcave.com/3006/power-rack-attachments-compatibility-master-list/
- How To Choose A Power Rack – Glucksgym, accessed November 16, 2025, https://glucksgym.com/pages/how-to-choose-a-power-rack
- Is anyone totally happy with their budget/cheaper power rack? : r/homegym, accessed November 16, 2025, Reddit Thread
- Inspecting Welds on Gym Equipment, and it’s SHOCKING – YouTube, accessed November 16, 2025, https://www.youtube.com/watch?v=V-OUA46bakU
- How to Determine a Good Weld vs. Bad Weld – PBZ Manufacturing, accessed November 16, 2025, https://pbzmfg.com/blog/good-weld-vs-bad-weld/
- Welder’s Visual Inspection Handbook – HII, accessed November 16, 2025, PDF Document
- Bolt Grade Markings and Strength Chart, accessed November 16, 2025, BoltDepot.com
- J-Cup Protectors Review | Two Rep Cave, accessed November 16, 2025, https://www.tworepcave.com/14647/j-cup-protectors-review/
- Rep Fitness J cup failed while benching. I didn’t get hurt, but I’m pissed that this broke., accessed November 16, 2025, Reddit Thread
- Purchased a Rogue Rack and paint is peeling, anyone have this …, accessed November 16, 2025, Reddit Thread
- Rep pr 5000 powder coat issues and how to protect it. : r/GarageGym, accessed November 16, 2025, Reddit Thread